
The Joy of Decorating Christmas Cookies
Christmas is a time for festive celebrations, cozy gatherings, and delicious treats. One beloved tradition that brings joy to both young and old is decorating Christmas cookies. Whether you’re a seasoned baker or just starting out, decorating cookies is a fun and creative activity that allows you to express your holiday spirit in edible form.
Choosing the Right Cookies
The first step in creating beautifully decorated Christmas cookies is selecting the right base. Sugar cookies are a popular choice due to their smooth surface and mild flavor that pairs well with various decorations. Gingerbread cookies are another classic option, known for their warm spices and sturdy texture that holds up well under decorations.
Decorating Techniques
There are countless ways to decorate Christmas cookies, from simple icing designs to intricate royal icing piping. Here are some popular techniques to try:
- Icing Glaze: A simple mixture of powdered sugar and milk creates a smooth glaze that can be tinted with food coloring for a vibrant finish.
- Royal Icing: This versatile icing dries hard, making it perfect for intricate designs like piping borders, flooding areas with color, and creating delicate details.
- Sprinkles and Edible Decorations: Add texture and sparkle to your cookies with colorful sprinkles, edible glitter, silver dragees, or other festive decorations.
- Candy Melt Drizzle: Melted candy melts in various colors can be drizzled over cookies for a quick and eye-catching decoration.
Getting Creative
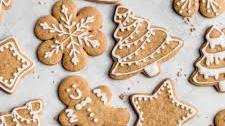
Don’t be afraid to get creative with your cookie decorations! Experiment with different colors, patterns, shapes, and textures to make each cookie unique. Use cookie cutters in holiday shapes like stars, trees, snowflakes, and gingerbread people to add an extra festive touch.
Tips for Success
To ensure your decorated Christmas cookies turn out beautifully, consider the following tips:
- Piping Consistency: Adjust the thickness of your royal icing for different decorating techniques – thicker icing holds its shape for piping outlines while thinner icing spreads smoothly for flooding.
- Drying Time: Allow each layer of decoration to dry completely before adding another layer to prevent smudging or blending colors together.
- Cool Cookies Completely: Make sure your baked cookies are completely cooled before decorating to prevent the icing from melting or running off.
- Have Fun! The most important tip of all – have fun while decorating! Let your creativity flow and enjoy the process of making edible works of art.
So this holiday season, gather your loved ones around the kitchen table, put on some festive music, and let the magic of decorating Christmas cookies bring joy and cheer to your home. Happy baking!
5 Essential Tips for Perfectly Decorated Christmas Cookies
- Use royal icing for easy decorating and a smooth finish.
- Add food coloring to the icing for vibrant colors.
- Use different shaped cookie cutters for variety.
- Sprinkle edible glitter or colored sugar for extra sparkle.
- Let the cookies cool completely before decorating to prevent the icing from melting.
Use royal icing for easy decorating and a smooth finish.
For easy decorating and a smooth finish on your Christmas cookies, consider using royal icing. Royal icing is a versatile icing that dries hard, making it ideal for creating intricate designs and details on your cookies. Its smooth texture allows for precise piping and flooding techniques, resulting in professional-looking decorations that will impress your friends and family. With royal icing, you can easily achieve a polished and elegant finish on your holiday treats.
Add food coloring to the icing for vibrant colors.
Enhance the festive spirit of your Christmas cookies by incorporating food coloring into your icing. By adding vibrant colors to your icing, you can create a visually appealing and eye-catching display that captures the essence of the holiday season. Whether you opt for traditional reds and greens or experiment with a rainbow of hues, using food coloring allows you to customize your cookies and make them stand out as delightful treats that are as beautiful as they are delicious.
Use different shaped cookie cutters for variety.
For a delightful variety in your Christmas cookie decorations, consider using different shaped cookie cutters. By selecting a range of shapes such as stars, trees, snowflakes, and gingerbread people, you can add visual interest and charm to your cookie collection. Experimenting with various cookie cutter designs allows you to create a festive assortment that will delight both the eyes and taste buds of your family and friends during the holiday season.
Sprinkle edible glitter or colored sugar for extra sparkle.
Enhance the festive spirit of your Christmas cookies by sprinkling them with edible glitter or colored sugar for an extra touch of sparkle. These shimmering decorations not only add visual appeal but also bring a delightful crunch and sweetness to your treats. Whether you’re aiming for a subtle glimmer or a bold pop of color, edible glitter and colored sugar are sure to elevate your cookie decorations and make them shine bright during the holiday season.
Let the cookies cool completely before decorating to prevent the icing from melting.
Allowing the freshly baked Christmas cookies to cool completely before beginning the decorating process is a crucial tip to ensure the success of your cookie creations. By letting the cookies cool thoroughly, you prevent the risk of the icing melting upon contact with warm surfaces. This simple step not only helps maintain the integrity of your decorations but also allows for a smoother and more precise decorating experience, resulting in beautifully adorned cookies that are sure to impress during the festive season.
Tags: candy melt drizzle, christmas, christmas cookies to decorate, cookies, cool cookies completely, creative, decorate, decorating, drying time, edible decorations, food coloring, have fun, icing glaze, piping consistency, royal icing, sprinkles, tips for success